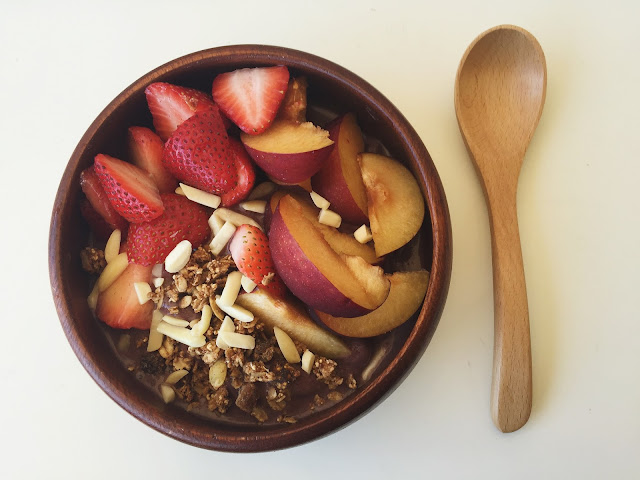
fall acai power bowl

OK, it's totally been a while.

After taking my boards -which I hopefully passed,  I've been literally taken by whirlwind. Fall quarter started last week, my mom came to visit, I went home for the weekend and I didn't gym at all during this time! It's only the second week of fall quarter but this quarter hit me like a train and I can't seem to catch a break. My days (and nights) are now spent in lab and I can practically call it my second home. Although I'd much rather prefer doing lab work versus studying, I come home feeling so exhausted and drained that I have no energy or motivation to do anything else.

Well, today is a new day and plus it's Friday! We start class late today (but end late, boo.) so I had the opportunity to make myself a decent breakfast. Plus I was super excited to use my new wooden spoon, which I've searched far and wide for. I couldn't seem to find an affordable (like under $5) wooden spoon, but my mom did! You'd never guess where though... Daiso. Out of all the places to look, right? But anyways, here is my start-of-fall-quarter-acai-power bowl to get me through the day, topped with some autumn-ish ingredients.


Here's what you'll need:
Acai base:
1 frozen banana
1 pack Sambazon Acai pack
1/2 cup almond milk

Toppings:
Purely Elizabeth Pumpkin Fig granola
Slivered almonds
Strawberries
Plum
Silvered almonds

Blend together the banana, Sambazon Acai pack and almond milk until smooth. Then top with the ingredients listed above and enjoy!

Happy Friyay,
Theresa

{flourless} chocolate protein pancakes

I gotta admit, I've been kind of in the slums lately. Studying for boards and knowing that I don't really get a summer break to enjoy has really gotten to me that I've been nothing short of pessimistic and resentful. Well, that was me all last week, too bummed out by all the fun I could be having to have any motivation to cook or blog.

Okay, well I'm over it. Enough complaining on my part, I only have like a week left to endure and it'll all be over before I know it! And quite frankly, it's not even really that bad. Sometimes I need to experience these lows to just shake myself out of it and tell myself to hustle through. Anyways, its a start of a new week (kind-of) and once my newfound energy channeled in, I decided to get creative.

I've been wanting pancakes and I've been literally seeing pancakes everywhere on Instagram; so why not make these hotcakes?! Oh and I needed to add in some protein as this was my post-workout meal so I incorporated some protein powder for them gainz (totally kidding, but not really).


As you probably already know, the typical fluffy buttermilk pancakes require a lot of butter and flour. So I actually replaced a few of these ingredients with some healthier alternatives which did change the overall texture just a bit, but it still tastes pretty damn good.

Here's what you'll need:
1/2 cup oatmeal "flour" (blended oatmeal)
1/2 cup almond milk
2 tbsp of chocolate protein powder
1 egg
1/2 tsp of baking powder
Pinch of salt

Blend/mix all of these ingredients together to make your batter. Heat and spray a nonstick pan on medium heat. Pour in 1/4 cup increments of your batter and allow for it to cook (about 1-2 min) until it bubbles up. Flip it over and cook for another 1-2 minutes. Recipe should make 4-5 pancakes! Top with chocolate syrup, bananas, granola, coconut flakes or any other toppings of your choice.

Enjoy,
Theresa

rosemary garlic rack of lamb

Well, tomorrow marks the end of our summer quarter and the start of our 3 week break before fall quarter starts again. Nonetheless, this quarter flew by and I really can't believe we'll be welcoming new first years in less than a month! Even though we all complain and dread the workload put on us, t's crazy to think how much we've learned and done in such a short amount of time. Someone mentioned this to me in passing and its literally spot on:
 "The days are long but the years are short."

Anyways, I shouldn't get too excited as I'm actually spending my summer break studying for part I of my boards. And when that time comes, prepare yourself for a slew of crockpot recipes as that will probably be the most efficient way for me to meal prep for those long study days. Don't worry, I'll keep them creative and tasty all the same.

I suppose, in celebration of almost being done with finals and in preparation of slow-cooked food for the next few weeks, I decided to indulge myself to a pretty hearty and savory meal featuring a new favorite of mine: rack of lamb. 


In a previous post, I mentioned how much I used to hate it and that was no joke, I would literally take a bite of it and spit it right back out. I don't know what changed or if it's just that I'm getting older and I'm acquiring a palate for things I didn't use to (wine being one of them). I guess dental school really does age you...


Ok and on top of all that, I mean, I was really turned off by how much I'd have to prep to cook red meats like this. I always thought it would take a lot of time and effort, but really this recipe was super easy and it honestly didn't require very much... So start getting them racks in the oven because this recipe is SO worth it. 

Here's what you'll need:
Rack of lamb (Trader Joe's)
2-3 tbsp chopped rosemary
Pepper (to season)
Lemon/lime
3 garlic cloves (minced)

Preheat oven to 425 degrees. Squeeze half of a lemon or lime onto the rack of lamb, ensure that both sides are covered with the juices. Season with pepper and rub it onto both sides. On a plate, mix the chopped rosemary and minced garlic and place the lamb (bone side down) onto the seasonings. Move the lamb around to allow for maximum coverage, flip it over and repeat on the other side.

Place the lamb bone side down on a rack over a foiled pan (if you have one), if not, just place it directly on a foiled pan and allow it to roast for 15 minutes.  Once the time is up, remove it from the oven and let it stand wrapped in foil for about 5 minutes before slicing. To sear, just heat up a pan with oil on high and sear each side until desired browning/cooking. 

I also added onions, mushrooms and asparagus in the oven as the lamb was cooking -so everything was made all in one go! Super easy, delicious, and I seriously just can't get enough.


Enjoy,
Theresa


how to cold brew 101

Some days I wake up thinking I'd be completely fine without my cup of coffee only to realize mid- lecture that I actually really  needed it. I've become somewhat dependent on it, -which is terrible, trust me I know,  but amidst the long days and late nights, I think its the only thing that keeps me going. 

Oh yes, I've also taken up another hobby: calligraphy -obviously still in the works though!

I suppose I can speak for the majority of my class (and possibly the entire dental school) that coffee is a part of our lifestyle and it really is a necessity, an expensive necessity at that. At $2 for a decent cup of joe, coffee ain't cheap! But with little time and the dire need to stay awake, we really don't have a choice. Well, that's what I thought until I discovered how much easier and cheaper it is to just make cold brew!

I generally like my coffee black, no sugar no creamer. And for all you avid black coffee drinkers, it becomes very apparent when your coffee isn't fresh or it's just plain old as it becomes very, very acidic. So Jess -my neighbor, educated me on all the little minute details and differences in brewing coffee, from french press, drip coffee to cold brewing and she explained how the heating process actually speeds up the release of these acidic compounds. Cold brewing on the other hand, delays this process and it really encompasses all the rich and true aromas of your coffee beans, interesting isn't it?! So much science.

I honestly can't go back to regular coffee anymore because this just tastes so much better and I really feel like what I'm smelling is what I'm tasting. Plus, I can make a huge pitcher of it and it'll last me a whole week, imagine how many $2 cups you'd be saving!


Here you are, your ultimate guide to cold brew your own coffee -you can thank me later.

Here's what you'll need:
Fresh coffee beans (grounded)
A large pitcher
Coffee filters
Mesh strainer

Depending on how big your pitcher is, add about 1 cup of ground coffee for every 3 quarts (or 12 cups) of room temperature/cold water. Make sure you mix it well and allow for it to steep for about 12-16 hours. The longer you allow it to steep, the stronger it is! When the 12 hour steeping period is up, place a coffee filter over the mesh strainer and strain your coffee into another container. Once it is all strained, place and store in the fridge or you can immediately serve it over ice!

Happy Monday,
Theresa

mini pb&j cups

I guess I'm not alone in my love for PB&J as my classmates have been sending each other ideas for all things PB&J. So when I came across this recipe, I was sold -like literally, I dropped everything and made it then and there. Great thing was, I actually had most to all of the ingredients (with some modifications) so I really had no excuse not to dive right in.


I don't really buy or use jelly in any of my meals so that was something I had a shortage of. To solve this problem, I actually blended my supply of fresh blackberries and blueberries with some chia seeds to make my own jelly! Smart, right?

No, but really, it's actually really easy and I think it tastes so much better (not to mention, healthier) than store bought jelly/jam, which are usually full of preservatives and added sugar.


So here it is! Somewhat-my rendition to a Reese's PB cup
Here's what you'll need:
1/4 cup coconut oil
1/3 cup PB2
1 cup fresh berries
1 tbsp chia seeds
~4-6 tinfoil cupcake liners

Berry jelly
Blend a cup of fresh berries and a tbsp of chia seeds. Place in the fridge for about 30 minutes or at least it hardens up a bit.

PB&J cups
Microwave the coconut oil for about 8 seconds and then add the PB2. Mix well and ensure all the powdered peanut clumps are broken up. Add a thin layer of the peanut butter mixture into the foil cupcake liners. Place in fridge for at least 10 minutes. Once the peanut butter layer hardens, add a spoonful of the jelly and smooth/even it out. Add the last layer of peanut butter on top of the jelly and place in the fridge for another 10 minutes. Once it cools and hardens, pop them out of their liners and enjoy!

Happy Monday,
Theresa

miso glazed salmon

I think one of the things I'm really grateful and appreciative for, -especially in these past few weeks where I started to lose a lot of motivation, is actually having someone there to continuously remind me of all the progress I've made and obstacles I've overcome. I'm so thankful that I have Jess, -my sister from another mister (who also is ironically my neighbor), to keep me accountable and for always providing me with words of encouragement.

We've actually been keeping each other on track with reminders of gym dates and our daily spiel on what we made and brought for lunch. And since we live like literally on opposite sides of the same floor, we've been cooking dinners together all while educating each other on new foods, recipes, and ways to prepare our meals. 

Today, we even had our own homemade shabu! All complete with tofu, bok choy, napa cabbage, enoki mushrooms, beef shabu shabu, pork sukiyaki, and of course peanut and ponzu dipping sauces. But that can be saved for another post!

I know, I'm totally late on this but about a week ago, Jess and I prepared our own delectable dinners where she made baked sweet potatoes with her amazing seared rack of lamb and I made miso glazed salmon over a bed of cabbage, kale, brussel sprouts and freekeh. 


In all honesty, I can probably eat my salmon marinated in this glaze like everyday. Ever since I discovered it, it's been my go-to salmon dish, just because its so easy and it tastes so good. My mouth is watering as I type this, btw.


Anyways!
Here's what you'll need:
Large salmon filet (cut into 5-6 pieces)
Chopped scallions/green onions
Roasted sesame seeds

Miso glaze marinade
1/4 cup of light brown sugar 
1/2 cup rice vinegar or mirin
1/2 cup yellow miso paste
1/4 cup soy sauce

Mix all the marinade ingredients in a bowl and set aside. Place the filets in a large glass container and brush on the marinade -ensuring that all surfaces are covered in the glaze. Cover and place in the fridge for at least 30 minutes. 

Preheat oven and set to "BROIL." Spray a large foil-lined tray with some Pam spray and evenly place the filets onto the tray. Allow the salmon to cook in the oven for about 10-15 minutes. Add the scallions and green onions to garnish and you're done! I also used the same glaze to stir fry my veggies as there should be plenty left over.

Happy hump day,
Theresa


rocky road overnight oats


I really don't think there's anything more rewarding than reaping the fruits of your labor and realizing how god-damn good it tastes. For a while now I've been meal prepping most of my meals, just to do it. I would season my foods minimally and only really make or cook flavorful dishes maybe once a week and those would be the ones I'd post up on here. My lunches were generally very mundane with some form of peppered protein and steamed veggies. I know, so boring

The main problem with this though? I started binging and I mean binging hard. While I was eating healthy for the most part, I almost always resorted to binging on sweets and all the restricted foods I told myself not to eat. 

The solution to my problem? Meal prep food that I would enjoy and look forward to eating. Not only would I satisfy my cravings but I'll find satisfaction in knowing that I made this. So here it is, I think I've perfected the typical overnight oats recipe and made it something even Chloe (my food-sheltered classmate) said was amazing.

Here's what you'll need:
1/2 cup oats
1/2 cup unsweetened almond milk
1/2 tbsp chia seeds 
3 tbsp Optimum Nutrition Rocky Road protein powder (or any other chocolate flavor)

Mix all of these ingredients together in a jar. Leave in the fridge overnight and in the morning, top with fruits of your choice. I used blueberries, strawberries, bananas, granola and a tbsp of flaxseed meal to add more fiber in my diet! 

Happy Thursday,
Theresa


Powered by Blogger.